How to Use Suica on iPhone (Apple Wallet) in Japan: Add It, Top It Up and Ride
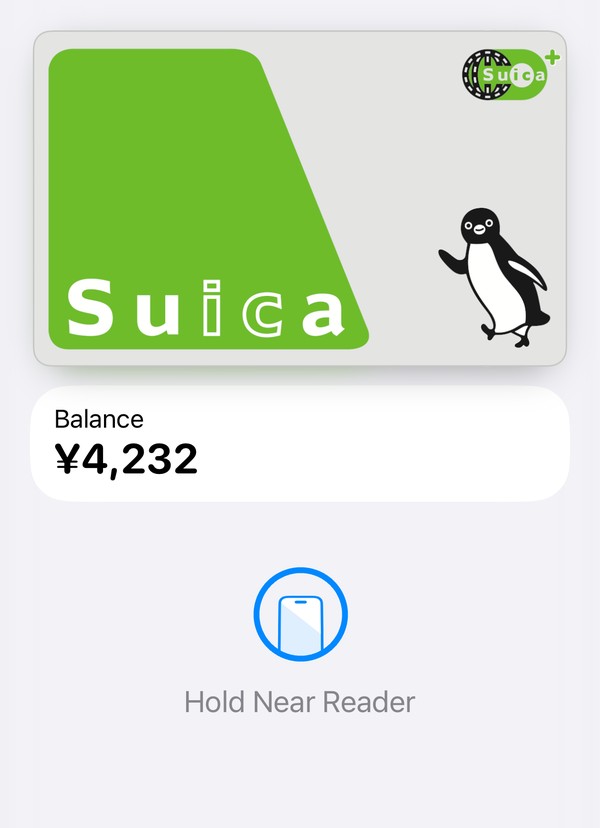
You don't need a plastic card to ride trains in Japan if you have an iPhone. Suica, Japan's best-known IC card, lives in the Apple Wallet app: add it in a few taps, top it up with Apple Pay, then hold your iPhone near the reader at the ticket gate, on the bus or at a convenience store. This guide walks through each step with screenshots from the site owner's own iPhone (in English), explains Express Mode, and covers what to do if adding money doesn't work and what happens to leftover money when you go home. Everything is checked against Apple's and JR East's official pages.
If you've never used an IC card before, don't worry: once it's set up, you just tap and walk through.
- What you need: an iPhone 8 or later, or an Apple Watch Series 3 or later
- Add Suica in Wallet: + → Transit Card → Suica → amount → pay with Apple Pay
- Express Mode: no Face ID at the gate, and no internet needed
- If your card is declined: top up with cash at a convenience store register
- The balance limit is 20,000 yen; spend what's left before you fly home
What you need before you start
Apple's support page for adding a transit card in Japan lists what you need:
- An iPhone 8 or later with the latest iOS it supports, or an Apple Watch Series 3 or later with the latest watchOS. Apple adds that an older iPhone 7 or Apple Watch Series 2 can carry Suica only if it was bought in Japan.
- An Apple Account signed in on the device, with two-factor authentication turned on.
- An eligible payment card in Apple Wallet, to pay for the money you put on Suica.
- A Face ID, Touch ID or passcode lock on your iPhone. Apple notes that if you remove your passcode or sign out of iCloud, your cards are removed from that device.
Apple Pay isn't available for children under 13 (the age varies by country or region). One more timing tip from Apple's troubleshooting page: from midnight to 5 a.m. Japan time, every day, you can't add a card or add money. If you land late at night, set up Suica before your flight or wait until morning.
Suica in Wallet or Welcome Suica Mobile?
There are two ways to get Suica on an iPhone. Both show up in Apple Wallet and both work the same way at the gate.
- Suica in Apple Wallet (the steps below): added straight from the Wallet app, with the items in the list above.
- Welcome Suica Mobile: a JR East app made for visitors, with an English screen. The Suica it issues is valid for 180 days, and JR East's terms say the balance can't be refunded. They also say you need a payment card in your own name in Apple Pay, and that in some countries the law means you can only set it up and add money after you arrive in Japan.
Not using an iPhone? The plastic Welcome Suica card and the other IC cards are compared in our guide to cash, cards and IC cards in Japan.
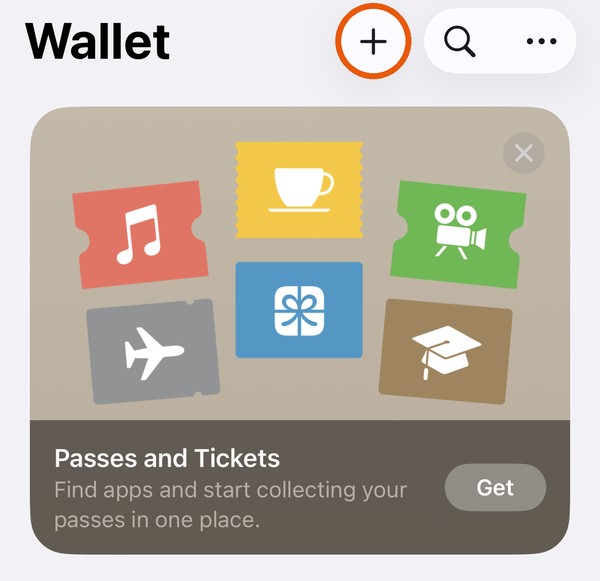
Step 1: Open Wallet and tap +
Open the Wallet app and tap the + button at the top right.
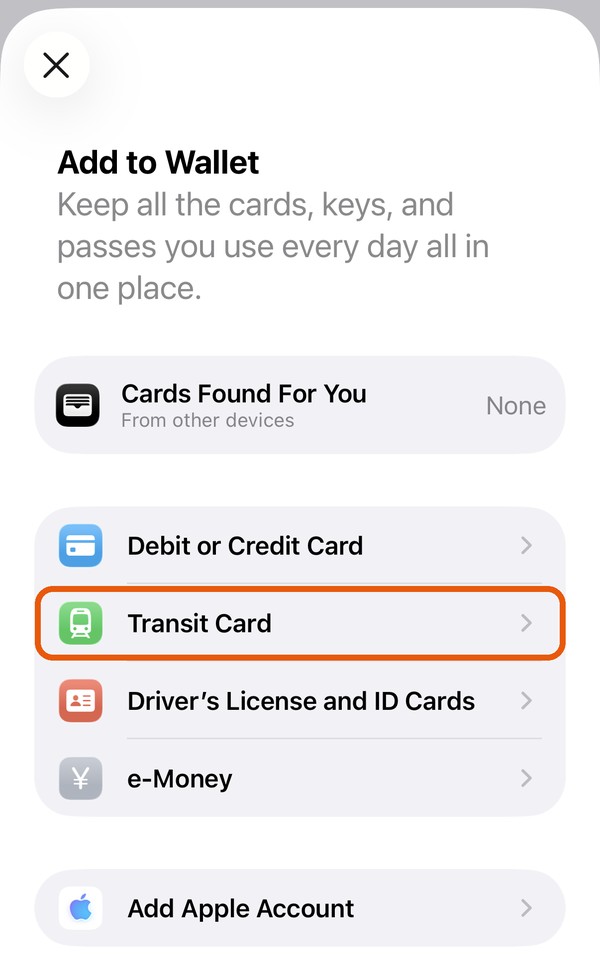
Step 2: Choose Transit Card
On the "Add to Wallet" screen, tap Transit Card. (On an Apple Watch, start from the Apple Watch app on your iPhone instead: My Watch → Wallet & Apple Pay → Add Card.)
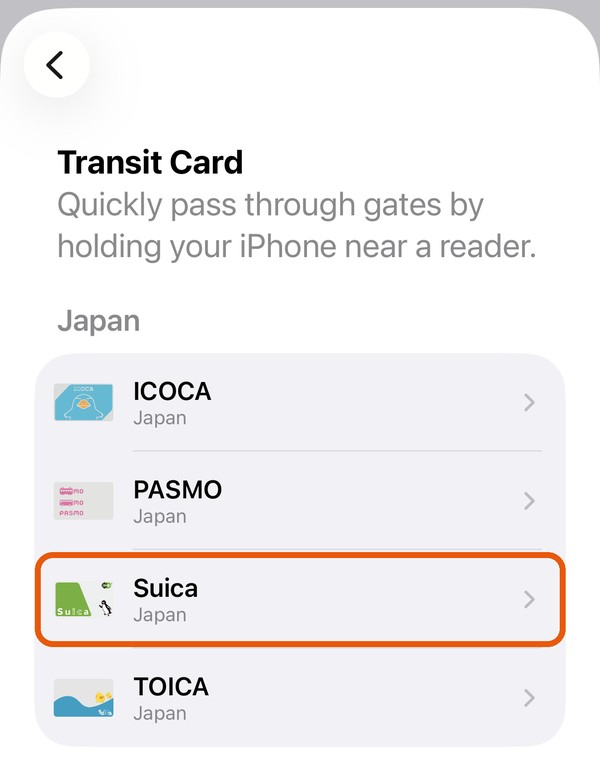
Step 3: Choose Suica, pick an amount and pay
Under "Japan", tap Suica. Then, following Apple's steps:
- Tap Add New Card. (If you already have a plastic Suica, Transfer Existing Card moves it and its balance onto your iPhone, and the plastic card stops working.)
- Choose how much money to put on the card and tap Add.
- Pick the payment card in Apple Pay and confirm with Face ID, Touch ID or your passcode.
- Wait for the Suica card to appear in Wallet.
If the payment is declined, see "If adding money doesn't work" below.
Step 4: Check that Express Mode is on
With Express Mode, you pay for rides and purchases without waking or unlocking your iPhone, without Face ID and without opening an app. Apple says Express Mode turns on automatically for the first transit card you add. To check it, as shown on Apple's Express Mode page:
- Open Wallet and tap your Suica card.
- Tap the ••• (More) button, then Card Details.
- Tap Express Transit Settings (or Express Mode) and make sure Suica is selected.
Only one transit card per transit network can be set to Express Mode. JR East warns (in Japanese) that if you set the wrong Suica by mistake, fares are paid from that card's balance, so check it if you have more than one.
Riding trains and buses: hold the top of your iPhone near the reader
At the ticket gate, hold the top of your iPhone (or your Apple Watch display) near the reader when you go in and again when you come out. You'll see "Done" and a check mark. Apple's page on using transit cards in Japan says the phone only needs to be turned on: it doesn't need a cellular or Wi-Fi connection.
- Trains, subways and buses: Suica works anywhere a physical Suica works, and where other IC cards that work together with it are accepted. A single trip can't cross from one IC card area into another; our guide to IC cards in Japan explains the areas.
- Limited express trains and Green Cars: JR East's Suica page says you need a separate ticket for these.
- Shops: convenience stores, vending machines and other places that show the Suica or IC logos. You may need to tell the clerk you're paying with Suica.
- Low battery: depending on your iPhone model, Express Mode can keep working when the iPhone needs charging. Apple says this power reserve works for up to five hours, but not if you turn the iPhone off. Don't count on it: carry a charger if you can.
For gate and bus manners, see trains and buses in Japan.
Checking your balance and the card menu
Open Wallet and tap Suica to see your balance. Tap the ••• button for the card menu.
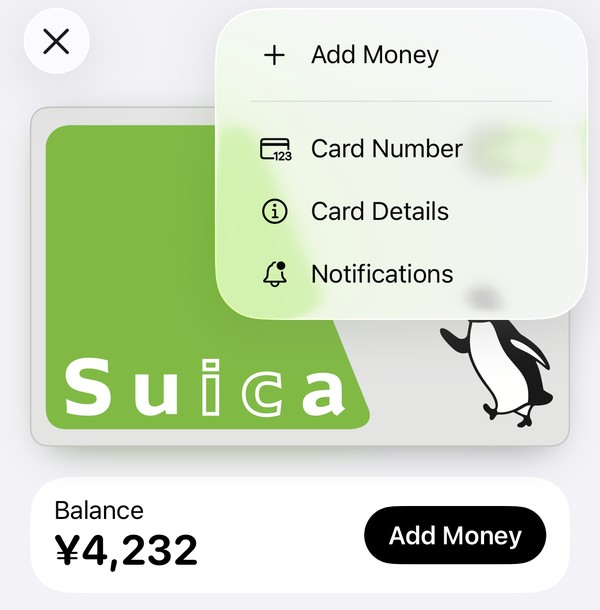
- Add Money: top up with Apple Pay (the next two steps).
- Card Details: Express Mode and Service Mode. Apple says to turn on Service Mode before you hand your iPhone to a station agent, for example if a gate stops you. If your balance doesn't update, turning Service Mode on and off can help.
Adding money: choose an amount
Tap Add Money. Tap one of the quick amounts (1,000, 2,000 or 5,000 yen) or type an amount.
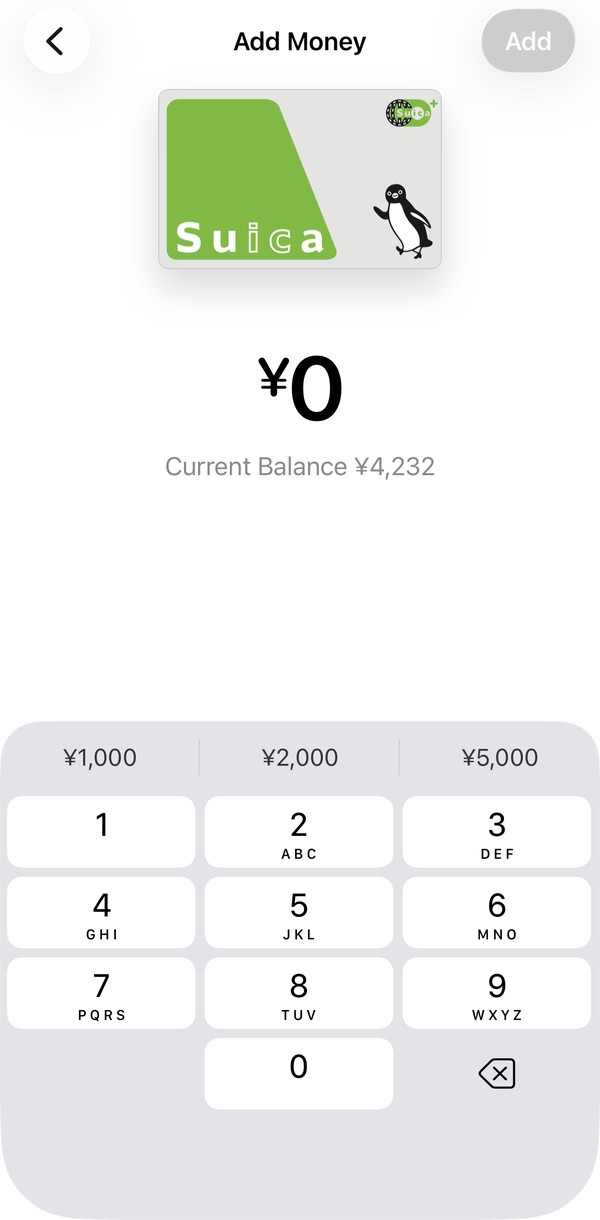
You can't go over the limit: JR East says a Suica can hold up to 20,000 yen.
Adding money: tap Add and confirm
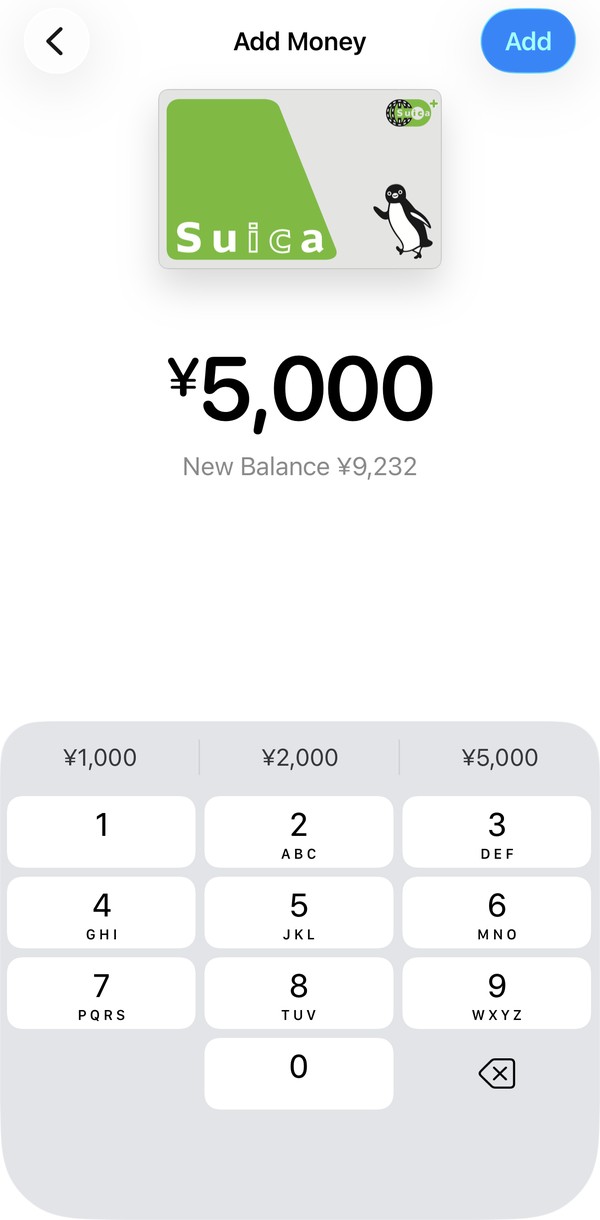
The screen shows your new balance. Tap Add, choose the card to pay with and confirm with Face ID, Touch ID or your passcode, as described on Apple's top-up page.
If adding money doesn't work
Apple only asks for "an eligible payment card in Apple Wallet" and doesn't list which cards from outside Japan work for Suica. Some cards issued abroad may be declined. (For JR East's separate Mobile Suica app, its sign-up page says cards issued outside Japan generally can't be registered.) Before you give up:
- Check the time: adding money doesn't work from midnight to 5 a.m. Japan time.
- Try another card in Apple Pay, and check that you're online.
- Top up with cash instead (below).
A Suica on your phone can be topped up with cash in yen, without opening any app. JR East's Mobile Suica help (in Japanese) lists these places:
- Convenience store registers: tell the clerk you want to add money to Suica ("Suica ni chaaji onegaishimasu"), hand over the cash and hold your iPhone on the reader.
- Seven Bank ATMs (in 7-Eleven stores) and some Lawson Bank ATMs.
- Charge machines with a tray at some stations, made for phones.
The plastic Welcome Suica card is different: JR East says it can be topped up only with cash. That's another reason to keep some yen on you.
Before you leave Japan: the money left on Suica
Plan to use up most of your balance on your last day, for example on the airport train or at a convenience store.
- Suica in Apple Wallet: JR East's Mobile Suica help (in Japanese) says a refund costs a 220 yen fee (none if the balance is zero) and is paid into a bank account in Japan, two weeks to a month later. Without a Japanese bank account, a refund isn't practical. If you'll come back, you can keep the card: JR East says the balance expires only if the card isn't used for 10 years.
- Welcome Suica Mobile: valid for 180 days, and the balance can't be refunded.
Getting a new iPhone? Apple explains how to move the card in Wallet or Setup Assistant; a Suica can be on only one device at a time.
Quick fixes
- The gate doesn't open: hold the top of the iPhone near the reader again. If a station agent needs to check your card, turn on Service Mode first.
- Suica isn't in the Transit Card list, or adding fails: update iOS, restart the iPhone and check Apple's system status page.
- Face ID appears at the gate: Express Mode is off or set to another card. Turn it on in Card Details.
- Planning your data: JR East's Mobile Suica help (in Japanese) says adding money in an app needs an internet connection, while riding and cash top-ups don't. See eSIM or pocket Wi-Fi for staying online.
Getting ready for the trip? Our checklist before you go covers the rest, and Narita Airport to Tokyo is a good first ride for your new Suica.
Last reviewed: October 17, 2026. Apple and JR East update these services; please confirm on the official pages below.
References
- Apple Support: Add a transit card to Apple Wallet in Japan
- Apple Support: Use transit cards on your iPhone or Apple Watch in Japan
- Apple Support: If you can't transfer transit cards to your iPhone or Apple Watch in Japan
- Apple Support: Use Suica, PASMO or ICOCA cards on iPhone or Apple Watch in Japan
- Apple Support: Top up your transit card with Apple Pay
- Apple Support: Use Express Mode with transit cards, passes, and keys in Apple Wallet
- Apple: System Status
- JR East: Suica
- JR East: Welcome Suica Mobile
- JR East: Rules for the Use of Welcome Suica Mobile
- JR East: Getting started with Suica on Apple Pay (Japanese)
- JR East: Suica on Apple Pay, e-money and the 20,000 yen limit (Japanese)
- JR East: Getting started with Mobile Suica, cards you can register (Japanese)
- Mobile Suica FAQ: Adding cash to Mobile Suica (Japanese)
- Mobile Suica FAQ: Refunding a Suica you no longer need (Japanese)
- Mobile Suica FAQ: What internet connection Mobile Suica needs (Japanese)
- JR East: Welcome Suica, purchasing and top-ups